/prod01/channel_54/media/header-images/ThinkstockPhotos-543066492.jpg)
Note 1: Each herbarium will have its own set of specific rules and guidelines. Be sure to request a copy of these instructions prior to collecting.
Note 2: It is good practice to do research about the herbarium prior to the scheduled visit. Be sure to know the names of any contacts at the herbarium before arriving.
Note 3: Practice good collecting etiquette for the duration of the visit. Use proper manners, dress, and collection protocol. It is also important to wear comfortable, supportive footwear.
Note 4: Out of respect for the herbarium and staff members, headphones should be worn at all times when listening to audio devices.
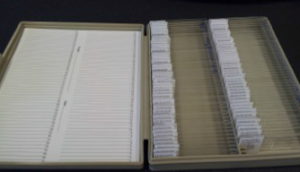
Note 5: Carefully handle all folders and sheets at the herbarium. This is vital. Be sure to maintain the correct order for folder and sheet stacking. Always keep the folders and sheets horizontal (with plant material facing up), even when searching through a specific family. This horizontal position must be maintained at all times, especially when transporting the material to and from the workspace.
Note 6: Never remove any plant material from a sheet with a single flower.
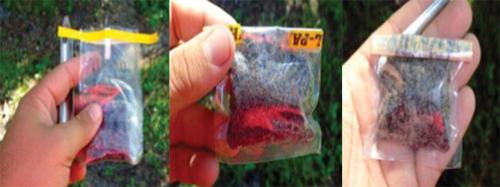
Note 7: As of 2014, small leaves, stems, bark and other plant material should also be collected, in case of future phytolith processing.
Note 8: If any plant material comes loose from the herbarium sheets during collection, it should be placed in the fragment pocket on the specific sheet. If there is no fragment packet on the herbarium sheet, request one from the herbarium staff.
Note 9: Only collect plant material from a single herbarium sheet. Examine several sheet wihin a folder before deciding which specimen is most likely to yield abundant pollen.
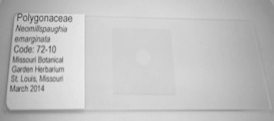
 Place a label with the collection information on the herbarium sheet after removing the plant material. This label should include by whom the material was collected, purpose, date, & location (see Figure 1).
| Missouri Botanical Garden Herbarium | ||||
|---|---|---|---|---|
| Family | Genus | Species | Notes | Collector/Herbarium Page # |
Note 1: There should be two sets of 24 tubes for each batch. Both sets will be prepared identically. After processing, one set will be use in mounting for light microscopy and the other set will be use for SEM photography. This will allow for ample pollen for each method.
Note 2: The flower material may need to be broken up in order to fit ideally into the tube. If so, try to break the material as little as possible to minimize debris. Also, if it is necessary to break up the material, try to do so within the tube to capture any pollen that may come loose from the flowers.
Note 3: If possible, only use a portion of the flower material in the packet. Any remaining material can be used for second preparation, if necessary.
Note 4: Prior to the first preparation of the day, be sure to thoroughly wash all tools to ensure that they are clean before the preparation begins. If there is any doubt about the cleanliness of the tools or workstation, thoroughly re-clean everything.
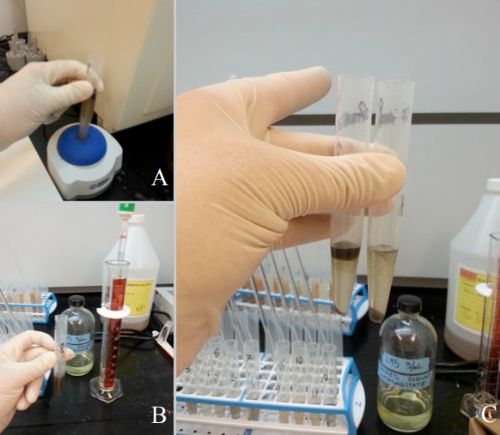
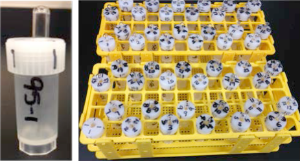 Label the two sets of 24 plastic tubes with the processing code number with a permanent marker. Each tube should be labeled with the batch number and the tube number. For example, Batch 75, Tube 3 would be labeled with code 75-3. This method should be used for labeling all of the tubes in the batch (see Figure 1).
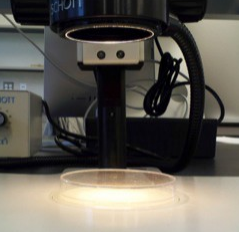
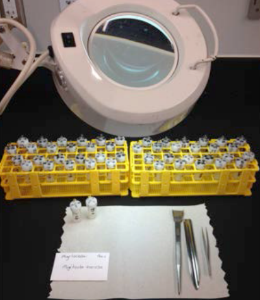 Place a clean paper towel on the counter of the workstation. Adjust the magnifying glass to the appropriate level for viewing. Place both of the corresponding numbered tubes onto the paper towel for ease of access (see Figure 2).
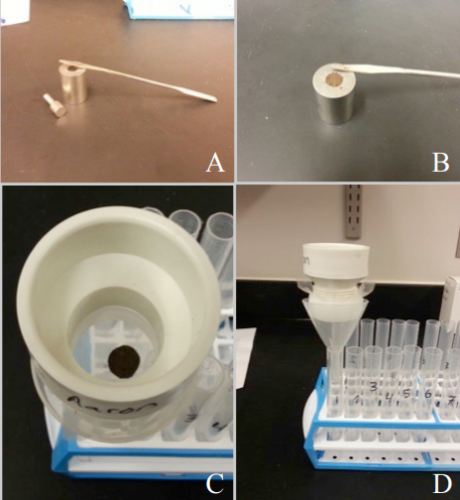
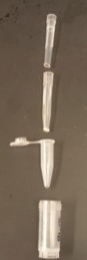 Place the filters inside microcentrifuge tubes, which then need to be placed into larger "buckets" (see Figure 1). Individual bucket assemblies are placed in the test tube rack next to each pollen sample, so each sample is paired with it's own bucket assembly.
Caution: The Acetolysis process must be performed in a water-free environment. Be sure to remove any water containers from the fume hood prior to starting this process.
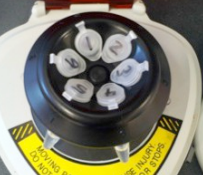
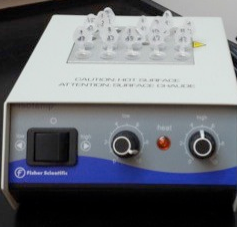 Place the tubes into the heater in the order by which the acid solution was added (see Figure 3). During this step, leave the caps OPEN. Add and remove samples in the same order that they were placed in the heat block. The first sample into the heater must be the first sample removed from the heater.
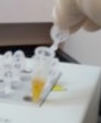 Once all samples are completed, turn off the heater and put away acetic anhydride and sulfuric acid containers.
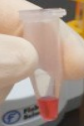 Fill each sample to the 100 μl (0.1 mL) line on the plastic tube with water.
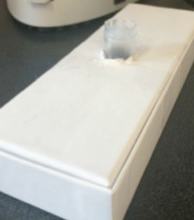 Syn-Matrix mounting medium
Note: To make glass tools from capillary tubes, melt the tube into 1 of the 2 following formations:
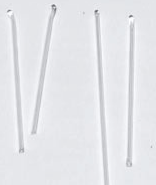 Round-tip tool: This tool can be formed by placing the end of a capillary tube into an open flame. By gently turning the tool, a bulbous end will start to form (see Figure 2A). Ensure the glass closes completely before removing it from the flame. Allow the tool to cool completely before use.
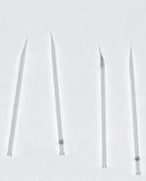 Needle-tip tool: This tool can be formed by placing the middle of a capillary tube over an open flame and slowly pulling the two ends apart. The result will be a long, thin glass section that resembles a tip of a needle (see Figure 2B). Allow the tool to cool completely before use.
 Retrieve the Syn-Matrix mounting medium from the refrigerator. Store the Syn-Matrix in the refrigerator when not in use to prevent the denaturing of the medium.
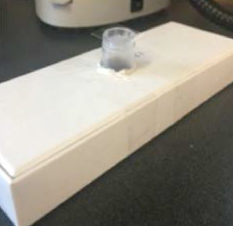
Note 1: Once the Syn-Matrix is placed on the slide, there is only 45 seconds or less to mount the pollen and place the coverslip onto the slide before the medium dries. Work quickly, or unwanted bubbles will form distorting the image of the pollen.
Note 2: Bubbles may form for two reasons:
Note 3: While spreading the pollen grains, attempt to place some in polar view, and some in equatorial view so that the species can be fully described at a later time. As previously stated, tapping or pressing too hard on the slide can cause it to move or crush the grains. Be gentle!
 Hold a clean microscope slide by the edges, and place a small amount of Syn-Matrix in the middle of the slide (see Figure 6). An ideal size would be about 0.5cm in diameter, 0.1cm in height.
Note 1: Ideally, five slides should be mounted for each sample. For samples with low pollen availability, mount as many slides as possible before the sample runs out.
Note 2: If pollen is not present in the sample from the start, two slides should be mounted before moving on to the next sample.
 Place the label for the sample on the left side of the coverslip (see Figure 7).
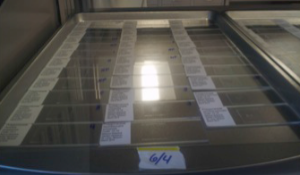
Note 1: Be sure to pack plenty of water, food and sun protection for the trip.
Note 2: Hiking boots should be completely clean and sterilized before the start of each collection day.
Note 3: Create a hiking itinerary before the collection day. This will provide the collector with detailed information about each site along the collection route. This will also provide a pre-determined starting location.
Note 4: Samples should be collected at a minimum distance of 1.61 kilometers (1 mile) from the previous sampling location or when a change of habitat occurs.
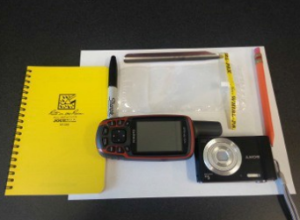
1. Record the start of the trip in the GPS and logbook. Provide elevation, time of day, date, area outlook, and coordinates in the logbook.
2. Label the Whirl-pack bag site location, waypoint number, and sample number.
3. Collect about 1/3 of the Whirl-pack bag by gathering soil from multiple locations within a diameter of 20 meters using the Scoopula (see Figure 2). Ideal samples are moist or wet soils. Avoid sandy soil (see Figure 3).
4. Clean the collection tools thoroughly after each use.
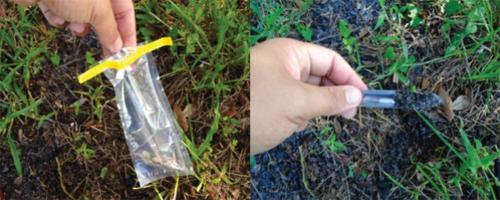

5. Place a small label written in pencil with the coordinates and sample number inside the Whirl-pack bag with the collected sample. The outside of each Whirl-pack bag must also be labeled with a permanent marker, indicating the coordinates and corresponding sample number (see Figure 4). All site information should be saved in the GPS and added to the logbook.

6. Seal the sample properly by extracting as much air as possible from the Whirl-pack bag (see Figure 5). Store the sample in a backpack, and continue to the next sample site.
7. Repeat the process using a new Whirl-pack bag at each collection site.
8. Scrape the bottom of your boot with the collection tool at the end of the trip to provide a comprehensive control sample.
9. See Figure 6 for idea examples of collection sites.

Note: Samples with large amounts of organic material (greater than 200 µm) will benefit from filtering the samples through a 200 µm screen into the centrifuge tube using deionized water (Figure 1C:1D).
To quantify the concentration of pollen types present in a sample, 16 µm polystyrene microspheres are added as a marker to the sediment sample at the start of the pollen processing. This allows the pollen concentrations for the soils from different eco-regions to be determined for the geo-location model.
 Note: Traditionally, 20,000 marker spores/cm has been utilized as a marker; therefore, a spike of c.5000 microspheres/0.25cm3 sample should be used. Divide 5,000 by the volume of solution to be added to determine the concentration of the solution (spheres/mL). This ensures that a homogenous solution is maintained and a consistent microsphere spike is added to the sediment sample every time sediment is prepared. If filtering the soil sample, add the microspheres to the surface of the soil pellet and then filter the sample.
If the soil from an area that has carbonate-rich substrate (e.g. limestone, gypsum), an acid wash may be necessary to remove it from the sample. If the sample appears very organic, this step may be skipped.
Tannins and humic acid can cause a sediment sample to stick together and darken pollen residue, making it harder to analyze.
Clays are a major component of soils and should be removed to concentrate the sample and prevent clumping.
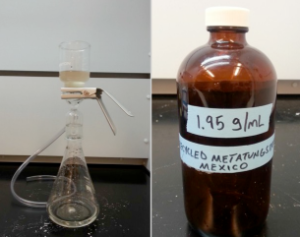
Concentrate the pollen from densor soil material using a 1.95 g/mL sodium metatungstate solution. If a 1.95 g/mL solution of sodium metatungstate is not available, one should be made from a powdered or concentrated liquid form of the compound. The solution's density is set at 1.95 g/mL in order to allow for the water trapped in the sediment to decrease the sodium metatungstate solution's density, without the solution becoming less dense than the pollen.
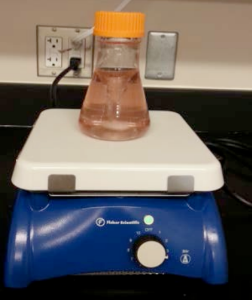
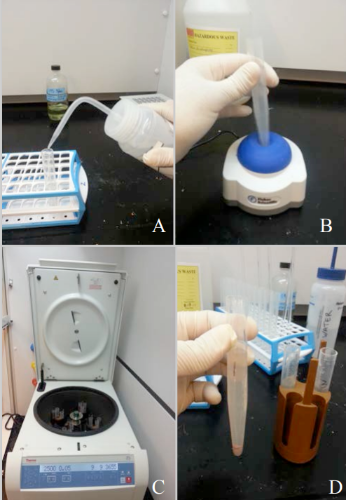
1. Add 2 mL of sodium metatungstate solution to each tube and vortex until the sample is completely homogenous. This may take 3-5 minutes (Figure 4). Large conglomerates of sample will prevent an efficient density separation and allow other soil material into the pollen residue.
2. Allow the solution to settle. The pollen will settle in a layer on top of the soil material.
3. Add 1 mL of sodium metatungstate along the sides of each tube to wash sample off the inner wall of the tube.
4. Centrifuge at no more than 1,8000 rpm for 10 minutes. The rpm rate should be increased very slowly over 3-4 minutes to provide the best separation of the pollen from other soil components.
5. Siphon the top layer of the solution into a clean centrifuge tube with a Pasteur pipette.
6. Pour the bottom layer (sodium metatungstate and non-pollen soil material) into a beaker for sodium metatungstate reclamation.
7. Add DI water to the new tubes to the 5 mL line and vortex.
8. Add more water to the 10 mL line of the tubes. If needed, add a small squirt of ethanol to break any surface tension.
9. Centrifuge at 2,500 rpm for 5 minutes.
10. Decant the sodium metatungstate solution into the reclamation beaker, leaving the pollen pellet in the tube.
11. Repeat steps 7 through 10 until two washes are completed.
Acetolysis solution composed of a 9:1 ratio of acetic anhydride and concentrated sulfuric acid, will digest all organic material, including pollen grains, so this process should be performed with caution. Soil samples should never be acetolyzed for longer than 5 minutes. The Acetolysis solution will turn the sample a dark yellow or light brown color once the reaction is complete. If there is little or no organic material, the sample may never darken to the yellowish brown color. Do not exceed the 5 minute time frame for the Acetolysis process.
Caution: The Acetolysis process must be performed in a water-free environment. Be sure to remove any water containers from the fume hood prior to starting this step.
In order to roll pollen grains on the slide during identification, a fluid media (e.g. glycerol) must be use for mounting.
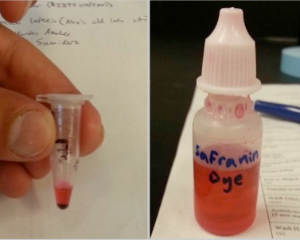
1. Add the same volume of glycerol as the volume of the pollen residue to the sample (e.g. 0.25 mL glycerol added to 0.25 mL of residue). Too small of a glycerol addition makes the sample too concentrated and too dark to easily count. Adding too much glycerol will dilute the sample, increasing the counting time for the sample. If a pollen residue is very small, glycerol should be added to the 0.05 mL line of the centrifuge tube so an adequate volume of sample/glycerol mix will be present to make one slide (see Figure 5).
2. Add safranin to the glycerol to stain the pollen surface, allowing for easier identification. A tiny amount (0.05 or 0.06 g) of safranin can be added to a large volume (50-75 mL) of glycerol. The final color of glycerol should be a shade or two lighter than strawberry jelly. Too dark of a stain will obscure pollen grain surface structure, and too light of a stain will not stain the surface.
3. Dry the samples (with caps open) overnight inside an oven (105°C).
4. The following day, smear the sample on slides for counting or store in a refrigerator/cold room for long-term storage.
Sodium metatungstate is very expensive, so care should be taken to try and recycle the solution after each pollen float procedure. A vacuum filtration set up makes recycling much faster and more effective (Figure 6).
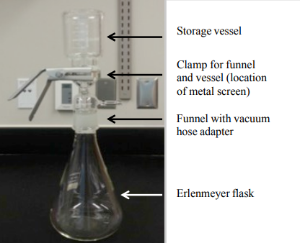
1. Place a 40 µm filter disc on the metal screen that rests on the funnel leading to the Erlenmeyer flask.
2. Clamp the storage vessel onto the funnel and pour the sodium metatungstate reclamation breaker into the vessel.
3. Rinse the beaker into the vessel with DI water.
4. Drain the vessel by gravity and then lightly rinse the sides of the vessel with DI water to remove any sodium metatungstate residue (see Figure 7).
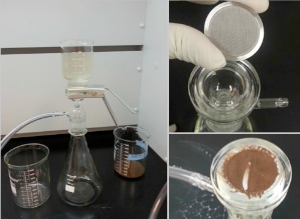
5. replace the 40 µm filter with a 2 µm filter disc.
6. Pour the filtered sodium metatungstate back into the waste beaker and rinse the Erlenmeyer flask into the beaker.
7. Re-clamp the vacuum filter set up with the 2 µm filter disc on the metal screen.
8. Pour the beaker into the storage vessel and rinse the beaker into the vessel (see Figure 8). The 2 µm filter will require negative pressure to filter the dirty sodium metatungstate as it moves from the vessel to the Erlenmeyer flask.
9. Connect the hose from the Erlenmeyer flask to the faucet-style mount on the vacuum unit.
10. Slowly open the vacuum unit so that a slow, steady trickle of sodium metatungstate solution moves from the vessel to the flask. Too strong of a vacuum will pull material that should be filtered through the screen.
11. Rinse the beaker into the vessel and rinse the sides of the vessel to remove sodium metatungstate residue.
12. Repeat steps 5 through 11 two to three more times to ensure all contaminating material (pollen and soil particles) is removed.
13. When the 2 µm filter appears clean, filtering is complete.
14. Transfer this solution from the Erlenmeyer flask to the beaker now labeled "clean sodium metatungstate".
15. Rinse the flask into the beaker and concentrate the filtered sodium metatungstate in a drying oven (105°C) over several days.
16. When the metatungstate is denser than 2.5 g/mL, correct the density to 2.00 g/mL and pour from the beaker into a bottle that is labeled "recycled sodium metatungstate" and include the density, as well as sample country of origin.
17. Rinse the beaker with a small amount of water (5 mL).
18. Mix and retest the recycled solution bottle's density. Note any changes on the bottle. As long as the density is between 1.85 and 2.0 g/mL density correction with water or a denser sodium metatungstate solution is not necessary. To prevent cross contamination, each country sampled should have it's own recycled sodium metatungstate solution to use for later soil sample preparations from that country.
Note: the top panel of the cartoon images below reflects the first plane of focus for the pollen grain. The lighter areas are indicative of protruding structures, such as echini or bacula; the darker areas are indicative of depressions or holes.
| Term | Description |
|---|---|
| Psilate |
Exine: Tectate |
| Perforate |
Exine: Tectate |
| Foveolate |
Exine: Tectate |
| Scabrate |
Exine: Tectate |
| Granulate |
Exine: Tectate |
| Verrucate |
Exine: Tectate, Semitectaate, Inectate |
| Baculate |
Exine: Inectate |
| Gemmate |
Exine: Inectate |
| Clavate/Pilate |
Exine: Inectate |
| Echinate |
Exine: Tectate |
| Microechinate |
Exine: Tectate |
| Areola |
Exine: Tectate |
| Rugulate |
Exine: Tectate, Semitectate |
| Reticulate |
Exine: Tectate, Semitectate |
| Microreticulate |
Exine: Tectate, Semitectate |
| Striate |
|
| Striate-reticulate |
Exine: Tectate; Semitectate |
| Term | Description |
|---|---|
|
Reticulum Cristatum Croton Pattern |
Special type of reticulum cristatum with regularly arranged elements on muri; typically comprised of five to six raised sculpturing elements around a circular area; add this description to "Note" section in the database |
|
Brochus |
Plural: brochi |
|
Bi-reticulate |
|
|
Heterobrochate |
|
|
Homobrochate |
|
NOTE: A dispersal unit for pollen is considered as mature or fully developed pollen grains.
| Term | Description |
|---|---|
| Monad |  Dispersal unit consisting of a single pollen grain Dispersal unit consisting of a single pollen grain |
| Dyad |  Dispersal unit consisting of two pollen grains Dispersal unit consisting of two pollen grains |
| Tetrad | 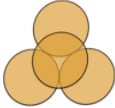 Dispersal unit of four pollen grains Dispersal unit of four pollen grains |
| Linear Tetrad |  Uniplanar tetrad where four units are arranged in a row Uniplanar tetrad where four units are arranged in a row |
| Rhomboidal Tetrad | 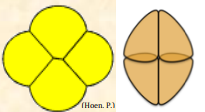 Uniplanar tetrad with the proximal sides of two individual units in direct contact, and the remaining two units are separated Uniplanar tetrad with the proximal sides of two individual units in direct contact, and the remaining two units are separated |
| Tetragonal Tetrad | 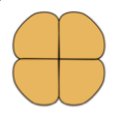 Uniplanar tetrad where all four units are in contact at the center for the tetrad forming a cross Uniplanar tetrad where all four units are in contact at the center for the tetrad forming a cross |
| T-Shaped Tetrad | 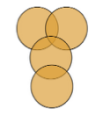 Uniplanar tetrad with two of the units perpendicular to the other two forming a "T" shape Uniplanar tetrad with two of the units perpendicular to the other two forming a "T" shape |
| Tetrahedral Tetrad | 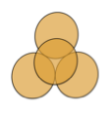 Multiplanar tetrad with each unit in contact with the other three units Multiplanar tetrad with each unit in contact with the other three units |
| Decussate Tetrad | 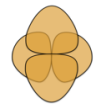 A tetrad of pollen grains arranged in two pairs lying across one another, the pairs (dyads) more or less at right angles to each other A tetrad of pollen grains arranged in two pairs lying across one another, the pairs (dyads) more or less at right angles to each other |
| Polyad | 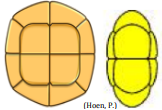 Dispersal unit consisting or more than four pollen grains Dispersal unit consisting or more than four pollen grains |
| Term | Description |
|---|---|
| Tectate |  Pollen grain with a continuous tectum; also known as 'eutectate' Pollen grain with a continuous tectum; also known as 'eutectate' |
| Semitectate |  Discontinuous tectum that covers less than 50% of the pollen grain's surface Discontinuous tectum that covers less than 50% of the pollen grain's surface |
| Inectate |  Pollen grain lacking a tectum; also known as 'acetate' Pollen grain lacking a tectum; also known as 'acetate' |
| Term | Description |
|---|---|
| Circular |  The length of the vertical axis and horizontal axis are approximately equal; ratio of 1:1 The length of the vertical axis and horizontal axis are approximately equal; ratio of 1:1 |
| Elliptic |  The length of the vertical axis and horizontal axis are unequal, one having a greater length than the other The length of the vertical axis and horizontal axis are unequal, one having a greater length than the other |
| Triangular Convex |  A triangular shaped grain with protuding walls connecting two apexes A triangular shaped grain with protuding walls connecting two apexes |
| Triangular Concave |  A triangular shaped grain with walls sloping inward connecting two apexes A triangular shaped grain with walls sloping inward connecting two apexes |
| Triangular Straight |  A triangular shaped grain with a relatively straight wall connecting two apexes A triangular shaped grain with a relatively straight wall connecting two apexes |
| Quadrangular |  A single unit pollen grain having four angles (degrees may vary) and four sides A single unit pollen grain having four angles (degrees may vary) and four sides |
| Quinquangular |  A single unit pollen grain having five angles (degrees may vary) and five sides A single unit pollen grain having five angles (degrees may vary) and five sides |
| Lobate |  A single unit pollen grain having distinctive lobes created by the inward folding of the apertures of the grain A single unit pollen grain having distinctive lobes created by the inward folding of the apertures of the grain |
| Term | Description |
|---|---|
| Oblate |  A grain with a polar axis that is shorter than the equatorial diameter in a ratio of approximately 0.5-0.75 : 1; (Polar length is 50% to 75% of equatorial length) A grain with a polar axis that is shorter than the equatorial diameter in a ratio of approximately 0.5-0.75 : 1; (Polar length is 50% to 75% of equatorial length) |
| Suboblate |  A grain with a polar axis that is shorter than the equatorial diameter in a ratio of approximately 0.75-0.95 : 1; (Polar length is 75% to 95% of equatorial length) A grain with a polar axis that is shorter than the equatorial diameter in a ratio of approximately 0.75-0.95 : 1; (Polar length is 75% to 95% of equatorial length) |
| Circular |  A grain with a polar axis and equatorial axis that are approximately equal in a ratio 1 : 1 (Polar and equatorial is relatively equivalent in length) A grain with a polar axis and equatorial axis that are approximately equal in a ratio 1 : 1 (Polar and equatorial is relatively equivalent in length) |
| Subprolate |  A grain with a polar axis that is greater than the equatorial diameter in a ratio of approximately 1 : 0.75-0.95 (Equatorial length is 75% to 95% of polar length) A grain with a polar axis that is greater than the equatorial diameter in a ratio of approximately 1 : 0.75-0.95 (Equatorial length is 75% to 95% of polar length) |
| Prolate | 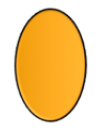 A grain with a polar axis that is greater than the equatorial diameter in a ratio of approximately 1 : 0.5-0.75 (Equatorial is 50% to 75% of polar length) A grain with a polar axis that is greater than the equatorial diameter in a ratio of approximately 1 : 0.5-0.75 (Equatorial is 50% to 75% of polar length) |
| Perprolate | 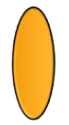 A grain with a polar axis that is greater than the equatorial diameter in a ratio of approximately 2 : 1 (Equatorial is 50% or less of Polar) A grain with a polar axis that is greater than the equatorial diameter in a ratio of approximately 2 : 1 (Equatorial is 50% or less of Polar) |
| Rectangular Tall |  An angular origin grain with four corner and four sides; polar axis is greater than the equatorial axis An angular origin grain with four corner and four sides; polar axis is greater than the equatorial axis |
| Rectangular Broad |  An angular grain with four corner and four sides; polar axis is less than the equatorial axis An angular grain with four corner and four sides; polar axis is less than the equatorial axis |
| Rhombic Tall | 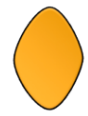 Oblique-equilaterally shaped grain with four angles and four sides; the polar axis is greater than the equatorial axis Oblique-equilaterally shaped grain with four angles and four sides; the polar axis is greater than the equatorial axis |
| Rhombic Broad |  Oblique-equilaterally shaped grain with four angles and four sides; the equatorial axis is greater than the polar axis Oblique-equilaterally shaped grain with four angles and four sides; the equatorial axis is greater than the polar axis |
| Term | Description |
|---|---|
| Annulus | 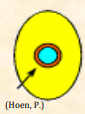 An area of the exine surrounding a pore that is noticeably differentiated from the remainder of the exine, either in ornamentation or thickness; "ring" An area of the exine surrounding a pore that is noticeably differentiated from the remainder of the exine, either in ornamentation or thickness; "ring" |
| Aperture | 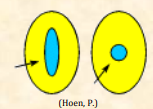 Region of the pollen wall that is morphologically and/or morphologically different than the rest of the wall; typically thinner than the surrounding wall. Apertures = site of germination. The pollen tube emerges through the aperture, that particular aperture becomes a "germinal" aperture Region of the pollen wall that is morphologically and/or morphologically different than the rest of the wall; typically thinner than the surrounding wall. Apertures = site of germination. The pollen tube emerges through the aperture, that particular aperture becomes a "germinal" aperture |
| Aperture Membrane Ornamentation |  The exine layer covering the aperture with noticably distinct ornamentation; typically a different pattern on the aperture than on the surface of the grain The exine layer covering the aperture with noticably distinct ornamentation; typically a different pattern on the aperture than on the surface of the grain |
| Colporus | 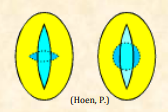 Compound aperture composed of a colpus and pore; plural: colpori Compound aperture composed of a colpus and pore; plural: colpori |
| Colpus |  Elongated aperture positioned along the equatorial region of the pollen grain or regularly distributed over the grain; plural: colpi Elongated aperture positioned along the equatorial region of the pollen grain or regularly distributed over the grain; plural: colpi |
| Columella | 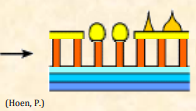 Rod-like structure element often used to support the tectum. Can also be free-standing, as found in semi-tectate grains; plural: columellae; Rod-like structure element often used to support the tectum. Can also be free-standing, as found in semi-tectate grains; plural: columellae; |
| Exine |  Outer layer of the pollen wall Outer layer of the pollen wall |
| Heteroaperture |  Pollen grain with two different types of apertures; only one type of aperture is functional, serving as the site of germination; the term typically applies to pollen grains with alternating colpi and Colpori; the term heterocolpate could be used to describe a grain that has two different types of colpi (see definition below) Pollen grain with two different types of apertures; only one type of aperture is functional, serving as the site of germination; the term typically applies to pollen grains with alternating colpi and Colpori; the term heterocolpate could be used to describe a grain that has two different types of colpi (see definition below) |
| Heterocolpate |  Pollen grains that possess two or more types of colpi, one of which differs in length and/or presence or absence of enddoapertures (pori), exine thinning, invaginations or other structures Pollen grains that possess two or more types of colpi, one of which differs in length and/or presence or absence of enddoapertures (pori), exine thinning, invaginations or other structures |
| Heterpolar |  Grain in which the distal and proximal faces of the exine are different either in shape, ornamentation or apertural systems; the red line in the image divides the proximal and distal faces of the grain, divided at the level of the pore Grain in which the distal and proximal faces of the exine are different either in shape, ornamentation or apertural systems; the red line in the image divides the proximal and distal faces of the grain, divided at the level of the pore |
| Isopolar | 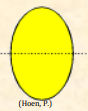 Grain in which the proximal and distal faces of the exine are alike Grain in which the proximal and distal faces of the exine are alike |
|
Lacuna Lophae a/k/a "Fenestrate" |
Window-like pattern of ridges (=lophae) formed by an outer exine surrounding window-like spaces or depressions |
|
Lumen |
|
|
Nexine |
|
|
Parasyncolpate Parasyncolporate |
|
|
Pore |
|
|
Pseudocolpus |
|
|
Sexine |
|
|
Syncolpate Syncolporate |
|
|
Tectum |
|
© Florida Institute of Technology, All Rights Reserved
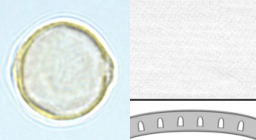 Completely smooth surface
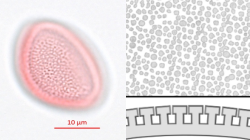 Surface having small holes or depressions less than 1 μm in diameter
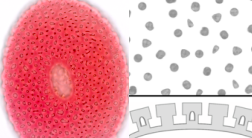 Surface having lumina (holes or depressions) 1 μm or greater in diameter; typically the distance between two adjacent lumina is larger than their diameter.
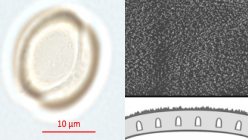 Any sculptural element less than 1 μm in diameter (shape may vary); pattern may appear more irregular (compared to granulate)
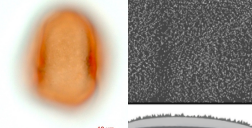 Any sculptural element less than 1 μm in diameter (shape may vary)
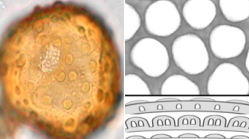 "Wart-like" sculpturing elements more than 1 μm tall; typically broader than they are high; never constricted at the base
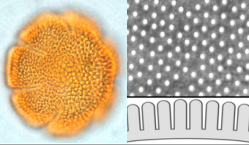 Rod-shaped sculpturing elements (bacula), longer than wide and greater than 1 μm high
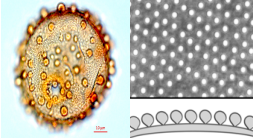 Sculpturing elements (gemma) higher than 1 μm; approximately the same width as height; constricted at their base; "balloon-like"
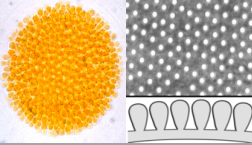 Club-shaped sculpturing elements (clavae), or rods with knob heads, appearing "lollipop-like" (pila); height greater than 1 μm; diameter of clavae or pila is smaller than its height; thicker at apex than at base
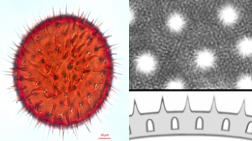 Pointed sculpturing elements (echini) 1μm or greater in height
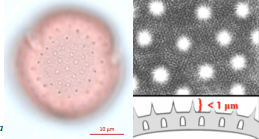 Pointed sculpturing elements (echini) less than 1μm in height
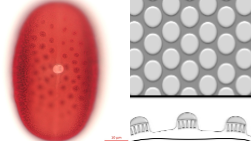 Small, and mostly convex, exine islands separated by grooves; a form of "negative reticulum"
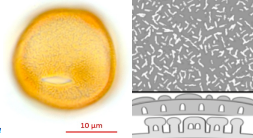 Elongated sculpturing elements greater than 1 μm long; pattern irregularly arranged; may resemble an intermediate between reticulate and striate, but this is not necessarily the case
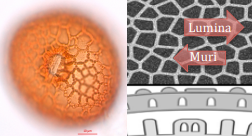 Sculpturing elements as ridges arranged in a network which has gaps (lumina) 1 μm or greater in diameter; Muri (breadth of ridges) equal to or narrower than the width of the lumina; also described as "network-like pattern" formed by muri
 Appears as reticulate; however, the lumina less than 1 μm in diameter
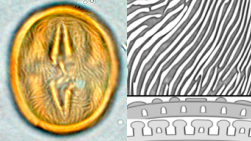 Sculpturing elements elongated with the length at least 2 times the width; running more or less parallel; Ridges = muri; gaps between = grooves; surface may look like a fingerprint
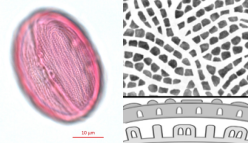 A pattern in which parallel rows of muri are linked to form reticulum within the grooves; the connections between the muri may lie on a single level or different levels
 Special type of reticulum; Muri has prominent sculpturing elements; add this description to the "Note" section in the database
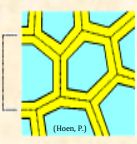 One lumen of a reticulum and half of the width of the surrounding muri
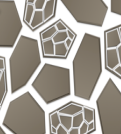 Large meshed reticulate (suprareticulum) filled with smaller meshed reticulate (microreticulum); can be categorized under heterobrochate
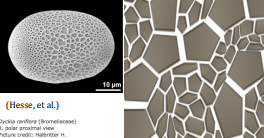 Reticulated pollen surface with brochi of varying sizes; the size variation may be random or gradual
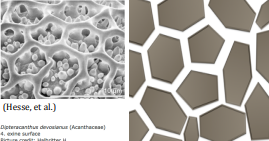 Reticulated pollen wall with brochi of uniform size
 Depressed area surrounded by ridges (lophae_ in lophate pollen grains; plural: lacunae
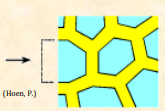 General term for space enclosed by muri (depicted in light blue); plural: lumina
 The inner, non-sculptured part of the exine, which lies below the sexine
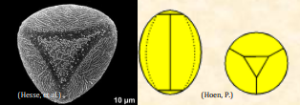 Grain with apertures that are split and attached to the adjacent aperture creating a triangular shape at the pole
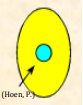 The endoaperture(s) situated at the equator or disbursed evenly over the pollen grain
 Colpus in heteroaperturate pollen grains, assumed to be a non-functional aperture
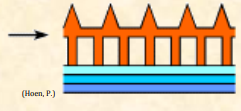 The sculptured outer layer of the exine
 Grain with apertures that have been fused together at one or both poles
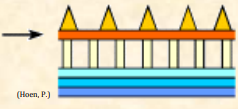 Outer layer of the exine; can be tectate, semitectate, or inectate