
/prod01/channel_54/media/header-images/telescope-header.JPG)
Preparing for Telescope Operation
- Things to do before you can use the telescope
- Make sure that the step ladder and any other objects are away from the telescope
- Make sure that all of the PCs are on
- On the telescope control panel, turn the MTR Driver Chassis switch to on
- Push the Halt Motors button to unhalt the motors
- Turn the Mirror Doors switch to open
- Opening the dome
- Open DFM and let it initialize, if it is not already open
- Under Telescope, click Misc
- Click Dome Shutter tab
- When opening the dome, always open the upper shutter first. Click Upper Shutter Open. The upper shutter takes a few minutes to open completely
- When the upper shutter has opened, click Lower Shutter Open
- *When the dome shutters open of close, oil may fall from the shutters onto the telescope, so ALWAYS open the shutters before opening the mirror doors
- Opening the mirror doors
- In the Misc window, click the Switch tab
- Change the dome status to On and click Apply
- Click Open Mirror Doors
Finding and Tracking an Object
- Turning tracking on and changing tracking rates
- In the Misc window, change the dome status from Home to Track and click Apply
- Under Telescope, click Rates
- Change RA Rate to 15.01 and click Apply
- Slewing the telescope
- Under Telescope, click Movement
- Enter the RA in Slew Right Ascension and the DEC in Slew Declination
- Enter the epoch in Epoch and click Apply
- Click Start Slew. The telescope will now slew to the position
Taking Images
- Turn off the spectograph control
- Under Telescope, click SAG/Spectrograph Control
- Click Apply to the 1 on Axis
- Setting up Maxim DL
- On the imaging laptop, open Maxim DL
- When Maxim DL is open, click the camera button at top of screen
- Under Setup, click Connect
- Setting up a filter
- In DFM, under Telescope, click Filter Selection
- Click Initialize and make sure it says Home
- Click on the filter you want and click Move to Selected Filter
- Taking a single image
- In Maxim DL, under Maxim CCD, Click the Expose tab
- Set the image parameters and click Expose
- Taking a sequence of images
- In the Sequence tab, Under options, Click Set Destination Path
- All images go to C:Data. You can set up a folder in this directory
- Under Options, click Set Sequence
- Enter the image parameters and Click OK
- Change filename to what you want
- Once finished, click Start
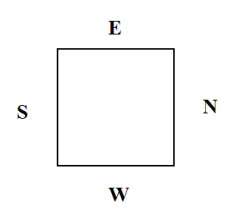
- Orientation of CCD image
- Images taken with the Ortega Telescope are mirrored and flipped. Here is a diagram showing the image orientation:
Differential Photometry
- Taking Bias images
- Make sure the mirror covers are closed
- Under Set Sequence, choose Bias
- Take about 30 images with 0s exposure time
- Make sure bias is in your filename
- Taking Dark images
- Make sure the mirror covers are closed
- Under Set Sequence, choose Dark
- Take about 12 images with 300s exposure time
- Make sure dark is in your filename
- Taking Flat images
- Make sure the mirror covers are open
- Set up portable lights so that they shine on projection screen
- In DFM, under Telescope, click Movement
- In the Offset Zenith tab, click Apply to the Set Flat Field Position option
- Click Start Slew. The telescope will now slew to the projection screen
- In Maxim DL, Under Set Sequence, choose Flat
- Take 1 image with a 1s exposure time. Check the photon count of the images. If the counts are less than 25000 or greater than 35000, then use more/less light or increase/decrease the exposure time
- For V and R filter, try 1s exposure time. For B filter, try 5-6 sec exposure time
- The sky can also be used to take Flat images. It is best to start taking images a few minutes after the sun has set
Closing
- Putting the telescope home
- Put the telescope to the zenith position
- Stop tracking by changing RA Rate from 15.01 to 0
- Close the mirror doors
- Closing the dome and taking bias/dark images
- If you have not already done so, once the mirror doors are closed, this is a good time to take bias images
- Change the dome status to On and Home. The dome will now go to its home position
- Once the dome is home, change the dome status to Off
- Close the lower shutter
- Close the upper shutter
- If you have not already done so, this would be a good time to take Dark images
- Turning the telescope off
- Push the Halt Motors button to halt the motors
- Change the Mirror Doors switch from open to closed
- Turn off the MTR Driver Chassis switch
- Leave all computers on and cameras connected
- Get some sleep!
Troubleshooting
- When the dome shutters do not open:
- In DFM, make sure the dome is on
- If dome is on and it still won’t open, manually cycle the power and try to open them again
- The last resort is to use the long dome crank to open the dome manually
- When the DFM shuts down unexpectedly:
- Click Don’t Send when prompted if you want to send a message or not
- Restart DFM
- DFM will not know where the dome is positioned, so put the telescope at the zenith position, move the dome to home using the control box, and turn on the dome
- If mirror doors do not open all the way:
- Lightly grab one mirror door and softly pull it open so all the others open
- If the filter slide gets stuck:
- Close DFM, restart it, and initialize filters
- If the dome will not track:
- Try turning the dome and dome track off and back on again
- If it still does not track, move the dome to home using control box, turn off the dome, turn off DFM, reopen DFM, and initialize the dome
- You can always rotate the dome manually using the control box
- If there is a total power loss during observation:
- Close the dome manually with the long dome crank
- If the telescope is not pointing well, you can reset the pointing using bright stars:
- In DFM, under Movement, select DFM Object Library
- Pick a bright star that is close to your field
- Using a short exposure, take a picture to see where the star is in the field of view
- Using the remote control, hold Set and move the telescope in the direction that gets the star to the middle of the field of view
- Once the bright star is in the middle of the FOV, go to Telescope, Initialization, Telescope Position, and click the Use Next Object Position button, and Apply it
- Move to your object